How To Create A Favicon.ico Image For Browser Bookmarks Favorites
This Page Contains information about How To Create A Favicon.ico Image For Browser Bookmarks Favorites By Webune in category Tutorial and Guides with 0 Replies. [670], Last Updated: Mon Jun 24, 2024
Webune
Tue Apr 22, 2008
0 Comments
840 Visits
Have you ever noticed that when you visit some web site, there is an icon small (little) image that shows (appears) at the top of your browser?
This step by step guide tutorial was provided kindly by our friends at www.wallpaperama.com
If you have, today you are going to learn how to install an icon picture for your web site, so when users visit your website, you can put your logo. Even better when a visitor bookmarks your url, the browser automatically saves in their favorites to identify your site.

Here is how to do this:
1. If you have windows, open paint. You can find it in:
Start > Programs > Accessories
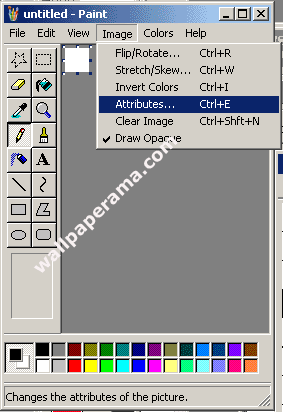
2. Set the dimensions to 24x24 pixels: in Image > Attributes (Control - E)
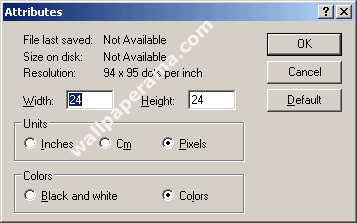
3. Set Width to 24 and Height to 24 and Click Ok.
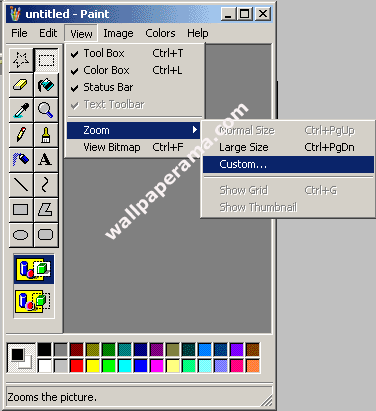
4. To help you create and edit your image better, zoom paint to the highest zoom which is 800%.
To do this, go to View > Zoom > Custom and Select 800%
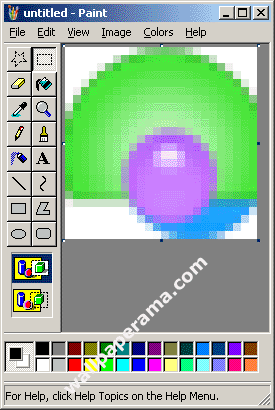
5. Create your logo or whatever you want your icon to look like:
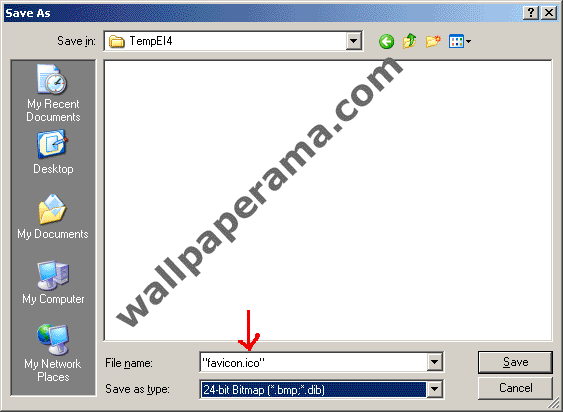
6. After you have created your image, save as "favicon.ico"
7. Now all you have to do is upload the favicon.ico image to your website root directory. The root directory is the main folder where all your files reside at, like your main index page. Some hosting companies will provide a directory called "html" or "public" or "web" "public_html". You MUST upload to your website root directory, otherwise, your browser will look for the favicon.ico image, will not find it and it will not display it on your browser.
8. Now that you have uploaded to your root directory, you are done.
DEMO: http://www.wallpaperama.com/favicon.ico
NOTE: There might other easy ways to do this, but this is the only way I know of. If you have a better suggestion, please help us by posting it here.
Thanks To The Wallpaperama Team For this helpful Tutorial
This step by step guide tutorial was provided kindly by our friends at www.wallpaperama.com
If you have, today you are going to learn how to install an icon picture for your web site, so when users visit your website, you can put your logo. Even better when a visitor bookmarks your url, the browser automatically saves in their favorites to identify your site.
Here is how to do this:
1. If you have windows, open paint. You can find it in:
Start > Programs > Accessories
2. Set the dimensions to 24x24 pixels: in Image > Attributes (Control - E)
3. Set Width to 24 and Height to 24 and Click Ok.
4. To help you create and edit your image better, zoom paint to the highest zoom which is 800%.
To do this, go to View > Zoom > Custom and Select 800%
5. Create your logo or whatever you want your icon to look like:
6. After you have created your image, save as "favicon.ico"
7. Now all you have to do is upload the favicon.ico image to your website root directory. The root directory is the main folder where all your files reside at, like your main index page. Some hosting companies will provide a directory called "html" or "public" or "web" "public_html". You MUST upload to your website root directory, otherwise, your browser will look for the favicon.ico image, will not find it and it will not display it on your browser.
8. Now that you have uploaded to your root directory, you are done.
DEMO: http://www.wallpaperama.com/favicon.ico
NOTE: There might other easy ways to do this, but this is the only way I know of. If you have a better suggestion, please help us by posting it here.
Thanks To The Wallpaperama Team For this helpful Tutorial